Contents
Introduction
Making a simple movie with moving camera
Making a movie with changing electron density level
General movie documentation
 |
CCP4 Molecular Graphics Tutorials | |
| Making Movies |
| Documentation Contents | On-line Documentation | Tutorials | CCP4mg Home |
CCP4mg can create movies in animated GIF or MPEG format or the screenshots written out by CCP4mg can be input to some other movie creation program. Either GIF or MPEG format can be incorporated into presentations such as PowerPoint but animated GIFs are more acceptable on web pages. To make a movie the program outputs a series of images which will be the frames of the movie and these are then compiled into one movie file. If you are making a longer, more complex, movie you can create several scenes which can be merged together later.
For a simple movie the only thing that moves is the camera; the movement helps the user to see the 3D depth and a movie often gives a better idea of the overall structure than separate, fixed viewpoints. For this sort of movie you select either the required movement (e.g. a rotation about the vertical axis) or choose the start and end view and the program will glide between these two views.
More complex movies can have some movement of models or changes to other properties of the displayed data. You can set up and save the two or more displays and the movie will be created to interpolate smoothly between the different displays.
Movies may look impressive if there is lots on the display and lots of movement but an audience will probably understand more about the chemistry if the pictures are simple and the movie is slow and repeats. For a presentation several short movies are probably more flexible than one long movie. Remember also that many data projectors have limited resolution and the maximum image size may be 600 by 600 pixels.
From the Applications menu choose Movie editor and New movie and enter a name for the movie. A directory called movie_name.ccp4mg_presentation will be created and all files created by the movie application will be saved here. The movie application window appears on the screen.
Set up a picture and make sure the model is in the centre of the display. Now make a snapshot of the current display by right-mouse clicking on the frame in the movie window labelled Save status here and select Save current view/display from the pop-up menu. A small image of the current display should appear in the movie window. This snapshot is labelled 00001, and subsequent snapshots will be labelled 00002, 00003 etc..
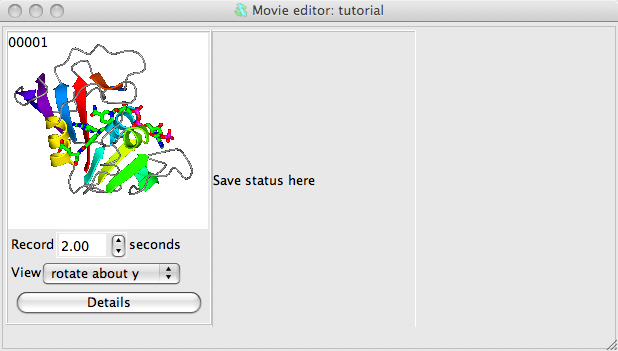
Beneath the image are some options; set the View to rotate about y. See what this does by selecting Preview from the Action menu. This will show you, in the main graphics window, what would appear in the movie but will not record anything. You can also try other options on the View menu: try setting to rock or transform. For the transform option you will need to click on the Details button and in the Transform details section of the Details window enter some transformation (for example 360 for X-rotation) and hit the Apply button.
To record the scene select Make movie in stages and Record frames from the Action menu. This will run through the transformation saving screenshots to files named movie_name.ccp4mg_presentation/scene_00001/frame_00001.png etc.. If screenshots are made offscreen then the main display window is not necessarily updated but you will see the progress reported in the top bar of the movie window. If the screenshots are NOT made offscreen (the usual default) then you will see the display updated but you must be careful not to obscure the main graphics window as this will corrupt the picture. You can check or change how screenshots are made by going to the Preferences and, from the Images and movies folder, select Screenshots.
When recording screenshots is finished go again to the Action menu and select Make movie in stages and Make movie scene. The separate screenshots are now merged into one movie file; this can take a little time, there is small window showing that the compile is being done and then the resultant movie is played automatically or can be played by selecting Play from the Action menu. By default an animated GIF file is created and replayed in the CCP4mg file viewer. Like most web browsers this will automatically play animated GIFs on a continuous loop.
Now try making the movie zoom-in from the view of the whole model to focus on a ligand. First make a copy of the first, 00001 snapshot by right-mouse clicking on it and selected Copy from the menu; then right-mouse click on the Save status here frame and select Paste. Now, in the main graphics window, zoom-in to a ligand - you may want to rotate and translate as well to get the best possible view. Then save that view by right-mouse clicking on the movie window frame labelled Save status here and select Save current view/display from the pop-up menu. The view of the ligand should now be displayed as the third snapshot in the movie window. In the interface below the second snapshot change the View menu to glide to and,in the new menu that appears, select 00003.
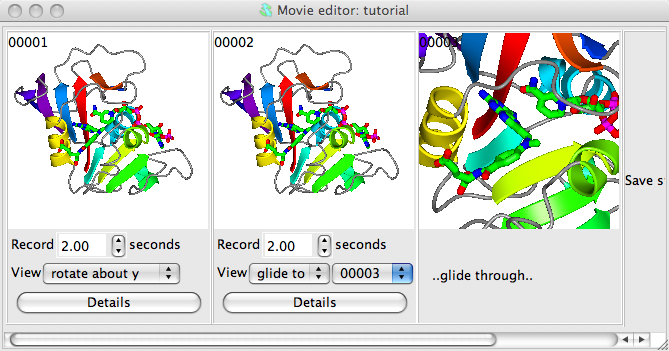
Now try Previewing the scenes. You may want to slow the movement down by changing the time from 2 seconds to something greater. You can also change a snapshot easily, for example try changing the final view zoomed-in on the ligand: first, restore the current view by double clicking with the left mouse button on the zoomed-in snapshot; then change the view in the main window; then go back to the zoomed in snapshot in the movie window and click on it with the right mouse button and select Replace. The snapshot in the movie window should be updated to the new view.
If you want to preview, record or compile just one scene then select the snapshot by clicking on it with the left mouse button. It will be highlighted by a cyan border and any actions will be applied to only this scene.
To continue the movie from here you might want to display the ligand binding site in more detail and try rocking the view.
Delete any loaded data (from Tools menu select For all data and Delete.) First close any current data using the Edit pull-down menu option
Now load the experimental data file dUTPase.mtz. After selecting the experimental data file there is a window in which you should select the data F_pf868_P41 and PHICalc and also choose a finer grid size, such as 0.5Å. Probably after the experimental data is loaded there will be several symmetry copied of the model displayed; since these do not help in making this picture they can be switched off by going to the initial line in the Display Table, the Crystals object, and in the third column change Continuous crystal to Symmetry off.
To display only a limited region of map, that covers the selected ligand atoms, go to the first column in the map display object line (currently labelled Extent 10.0) and select from the menu Clip.. and to dUTPase D/1(DUX). The map will now be clipped to the selected atoms.
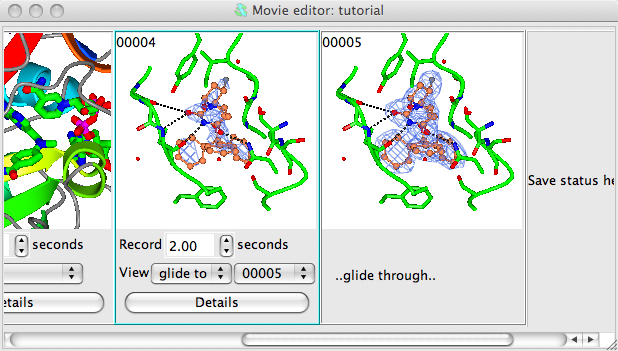
We want to make a movie in which the electron density contouring alternates smoothly between two contour levels. To define the two extreme contour levels you need to save snapshots at the two extreme positions. So first choose a low contour level (use the slider bar on the right side of the map contour line in the Display Table) and then right-mouse click on the Insert next snapshot here and select Insert current view/display from the pop-up menu and then set the high contour level and make a snapshot of that too.
In the interface below the first electron density snapshot:
choose a time period for the recording - 3 seconds is reasonable.
set the View mode to Glide to and the frame number to 00002 (or the id of the second frame)
Click on the Details button and in the details window check the box labelled Rock back to initial position. This will cause the electron density level displayed in the movie to oscillate between the two extreme values that you have set in the snapshots.
select the range of snapshots to preview/record by clicking on the first with left mouse button then, holding down the Shift key, clicking on the second snapshot. The two electron density snapshots should now be highlighted in gold.
Select Preview from the Action menu to see the result. The display should rock slowly and the contour level should gradually change. If you are happy click the Record button. You may want to try changing the time or rock parameters (in the Details window).