Contents
IntroductionOverview of the Movie Interface
Loading a New Snapshot
Transforming Display Objects
Animation in Movies
Scene Details
Preferences
Compiling Movies
Movie Compile Preferences
 |
CCP4 Molecular Graphics Documentation | |
| Movies |
| Documentation Contents | On-line Documentation | Tutorials | CCP4mg Home |
Molecular graphics movies are created by making many screenshots with one screenshot being equivalent to one frame of the movie. The screenshots are then compiled together into one movie file. It would be very tedious for you to set up and save every frame of a movie; instead, to make a movie in CCP4mg, you need to make some key 'snapshots' for each scene of the movie and the program will fill in the intermediate frames. The snapshots are displayed in the movie interface..
Below each snapshot picture in the interface are options to control the action when the program fills in the intermediate frames. This action can be a change in the view and/or a change in the displayed objects. The change in the view can be simple rotation or rocking about the vertical axis or some generic transformation that you can specify. It can also be a smooth glide to the viewpoint of the next snapshot. Various aspects of the display can be changed such as: the position of the objects, bond torsions (under development), electron density levels, parameters for calculations (such as maximum allowed length of a hydrogen bond) , colours. To specify the required change in the display you need to save a snapshot for both the beginning and end of movie scene with the display setup as you require and the program will smoothly interpolate the change through the movie scene.
CCP4mg will run the appropriate 'helper' programs (if they are installed on your computer) to convert the frames to the following movie formats :
You could also use the saved frames as input to a movie generating program of your choice.
To begin a movie pick New movie from the Movie editor option on the Applications pull-down menu and enter a name for the movie. For a movie called 'foo' CCP4mg creates a directory 'foo.ccp4mg_presentation' in your project directory. This directory will contain all of the screenshot and movie files that are created.
To load a snapshot, set up the display as you want it and then double click on the Insert snapshot here frame (or click with the right mouse button and and select Insert current view/display from the popup menu). The current program status is saved to a file and a small snapshot image is made and displayed in the movie interface as shown in the Introduction.
Note that the first snapshot is labelled 00001 and subsequent snapshots will be labelled 00002, 00003 etc..
One snapshot is enough to define a simple movie scene in which the view (controlled by a View menu underneath the snapshot picture) is either kept fixed, rotated (by 360 degrees about the vertical axis) or rocked (default 20 degrees about the vertical axis) or transformed by some rotation or translation that you should enter in the window accessed via the Details button. The time taken for the scene can be set in the first line underneath the snapshot picture. You can see the effect of these options using the Preview option on the Action pull-down menu - this will show what the movie would look like but does not actually make any screenshots.
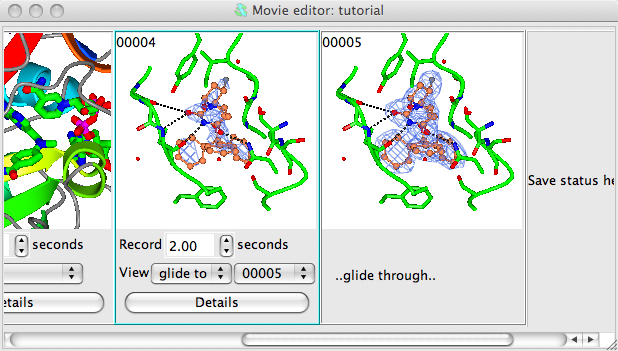
More complex movie scenes can be defined by adding more snapshots in which either the view or some property of the display (such as model position or electron density contouring level) is changed and the movie scene will move smoothly between the different snapshots' view or display properties. To do this you will need to insert one or more snapshots and choose the Glide to.. option from the view menu. You will then see a menu to select the index number of the last snapshot required in the scene. Note that the second and subsequent snapshots in a scene are then labelled ..glide through. See Transforming Display Objects.
To create a 'fly-through' effect in the movie you can save a series of different views, set the 'Glide to..' option for the first snapshot to the index number of the final snapshot and set the Record .. seconds time to something appropriate.
Animations can be recorded in a movie. To record an animation you need save a snapshot with the animation loaded (see the Animation documentation for details on loading an animation). Tte scene will be created with one step of the animation per frame of movie. See Animation in Movies.
There are various tools to change the snapshots set up in the movie interface.
A left mouse double-click on a snapshot picture will restore the status of that
snapshot. A right mouse click on a snapshot picture will bring up a popup menu with options to
Restore the display and/or the view saved for that snapshot
Replace the snapshot with the current display status
Set insert to move the insert frame before or after the snapshot
Cut to remove the snapshot from the interface (but note that files are not deleted and can be restored using the Load existing snapshot option in the Insert frame).
Copy to save the snapshot to a buffer which can be Pasted in the Insert frame.
The following tools can be applied to just one selected snapshot or range of snapshots. A left mouse click on a snapshot will select that snapshot and highlight it with a gold border. Holding down the shift key and clicking on another snapshot will select and highlight the range of snapshots. Where a snapshot does a glide or interpolate to one or more other snapshots then you only need to select the first snapshot or the group for all to be used.
Preview plays the frames that would make up the movie in the main display window but does not record anything.
Make movie records the frames of the movie and then coverts them to a movie. This option performs all three steps described below for Make movie in stages.
Make movie in stages is a menu with sub-menu options..
Record frames plays the frames and saves them. Note that the display might not change if the screenshots are done in offscreen mode (see here). The ccp4mg_presentation directory contains subdirectories for the scenes which are called
'foo.ccp4mg_presentation/scene_00001' to 'foo.ccp4mg_presentation/scene_n'.
After recording a scene the scene directory contains screenshot images which are named
'frame_000001.png' ,'frame_000002.png' etc.. Where a snapshot does a glide or interpolate to one or more following snapshots all the screenshots and movie files are saved into the scene directory of the first snapshot.
Convert frames to scene movie(s). compiles the frames into a movie for each of the selected scenes. The movie file is saved in the appropriate scene directory - so a typical movie file path name might be 'foo.ccp4mg_presentation/scene_00001/movie.gif'.
Compiling a movie can take some time and is
performed in the background - you can continue doing other things
while it is running.
Merge scene movies merges the movie files from the selected scenes into one movie file. For example if you merge scenes 00001 to 00004 then the resultant movie file will be called 'foo.ccp4mg_presentation/movie_00001_00004.avi'.
Play will play the movie.
A new snapshot will always be loaded into the position of the frame labelled Save snapshot here. This frame can be repositioned by clicking on a snapshot picture with the right mouse button and selecting the Set insert..before/after option from the popup menu. On the same snapshot popup menu is an option to Copy the snapshot. This can then be Pasted into the Insert frame. The new, pasted, snapshot is given a new label. The other options on the Insert frame menu are to Insert current/view display, that will create a new snapshot from the current graphics window display, and Load snapshot file which will list the existing snapshot files even if they are not currently loaded into the movie interface.
Some of the attributes of the displayed objects can be changed during the course of a movie so, for example, models can move and electron density levels can change. (Note that a model is moved using the Transform coordinates options on the model icon menu - the dot next to the model name.)
Currently the transformable attributes are:
Some calculation parameters such as the maximum hydrogen bond distance can also be interpolated. Requests for other options are welcome.
Other changes between snapshots such as adding or removing data or display objects will be ignored - the composition of the initial snapshot will be retained throughout the movie shot.
See the Animation documentation for details on loading an animation. To make a movie with one step of the animation per frame of movie you must load the animation then save a snapshot; "Animation of xxxx" will be written over the snapshot picture in the movie window and the run time for that shot will be set automatically to the appropriate time to run through the animation once. Note that the first frame will always have the animation step that was set when the snapshot was saved. If the display includes some feature such as hydrogen bonds which are dependent on the model conformation then they will be updated for each step of the animation. It is perfectly possible, but probably slow, to set the model display style to Surfaces which will be recalculated for each step in the animation.
There is a Details button for the first snapshot in each scene. The Details window has a collection of options for different view modes..
General
There is an option to 'rock' back to the initial position - with this set on the specified actions for the scene will be performed and then they will be reversed back to the initial view and display. The action of the scene can be repeated multiple times.
Rock options
The angle and period of the 'rock' view mode can be changed.
Specify transform
The rotation, translation and zoom components for any arbitrary transformation can be specified
Glide options
The speed of the glide changes can be ramped up and down at the end of the movement to give a smoother appearance to the motion
The Preferences for the movie are on the Edit pull-down menu. You can set the intended frame rate and width and height for the movie - note that if you change these you will have to re-record any existing frames or movie files. The movie format can be chosen but not that the formats available are dependent on the installation of appropriate helper programs. See Compiling Movies.
Screenshot drawing quality see Scene Details.
Movie compilation is done by the script $CCP4_MG/bin/compile_movie. This script can be run external to CCP4mg,
.../ccp4mg/bin/compile_movie -help
will give more information.
This script uses either:
convert program which is distributed with ImageMagick to generate animated GIF or MPEG1 format movies dependent on the file extension of the output file (should be .gif or .mpg). To get acceptable quality with the mpeg file the '-quality 100' option is necessary.
mencoder which is distributed with mplayer, can create movies in many different formats using a variety of codecs. The most useful is probably an AVI format file with MPEG4 encoding which should replay in PowerPoint. To get reasonable molecular graphics movies usually requires using the options for high quality and low compression. The default command line is:
-ovc lavc -lavcopts vcodec=msmpeg4v2:vbitrate=1800
Some web pages with appropriate advice on mencoder and ffmpeg:
http://electron.mit.edu/~gsteele/ffmpeg/
http://ffmpeg.mplayerhq.hu/compat.html for suggestions on using ffmpeg.
On Windows systems the Movie Maker utility can be used to convert either a collection of .png files or an animated gif file to some other movie format. To do this
1) from the File menu choose Import into collections
2) select the png or gif file and click Import
3) drag the frames or the movie from the middle view to the story board below
4) from the File menu choose Save movie file
Find these in the Preferences window in the Images and movies folder. For the three programs which can be used to compile movies (convert, ffmpeg and mencoder) you can specify the full path name for the program executable (so the the CCP4mg compile script can find it) and specify command line argements. Note that mencoder also has specific command line arguments for merging two movies. Similarly the full path and command line arguments for the mpeg player mplayer can be set.