Contents
IntroductionViewing an Animation
Making a movie
See also Animation reference.
 |
CCP4 Molecular Graphics Tutorials | |
| Animations |
| Documentation Contents | On-line Documentation | Tutorials | CCP4mg Home |
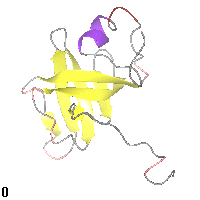
This is an example of a morph which is a short animation that shows the transformation between two conformations; it is intended to help a viewer visualise the differences between the conformations and there is no claim that the intermediate steps represent a true conformational pathway. The tutorial directory contains a subdirectory morph which contains a series of PDB files which come from the morph server MOLMOV (Yale Database of Macromolecular Movements) and show a morph between two conformations of the NMR structure 1liz.pdb.
See an example here - morphing between two of the NMR models in 1liz.pdb done by MOVMOL.
Delete any loaded models (from the Edit menu select For all models.. and Close) and then load the PDB file ccp4mg_tutorial/morph/ff0.pdb which is the first file of the morph. From the model icon menu (![]() ) select Animation and Load new animation.. and again select the PDB file ccp4mg_tutorial/morph/ff0.pdb - the program will now automatically select all of the other PDB files in the morph directory with related names. In the new window
) select Animation and Load new animation.. and again select the PDB file ccp4mg_tutorial/morph/ff0.pdb - the program will now automatically select all of the other PDB files in the morph directory with related names. In the new window
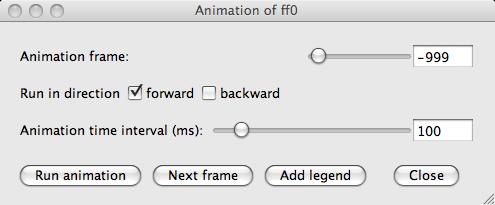
click on the Run animation button.
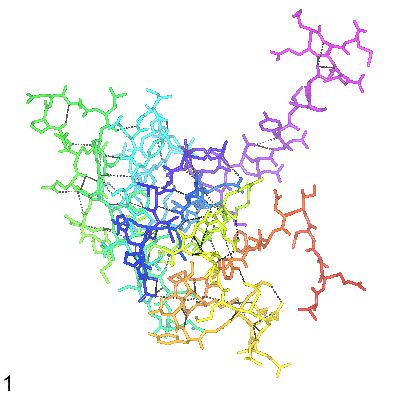
Now try creating a more complex picture - for example making the display style for the model Ball and stick and by displaying hydrogen bonds (from the model icon menu select Add display object.. and Hydrogen bonds). And run the animation again.
There is a separate Movie tutorial and movie reference with more information but this section will show quickly how to record an animation. If you are making your first movie then from the Applications menu choose Movies and New movie and enter a name; a directory, project_directory/movie_name.ccp4mg_presentation will be created this is where images are stored and the movie will be put.
Now reset the conformation to the first step by selecting Animation and Go to step.. and in the new window setting the step to zero. Make sure the model is suitably positioned in the centre of the screen.
Now make a snapshot of the current display by right-mouse clicking on the frame in the movie window labelled Insert next snapshot here and select Insert current view/display from the pop-up menu. A small image of the current display should appear in the movie window. This snapshot is labelled 00001 (any subsequent snapshots will be labelled 00002, 00003 etc.). Set the run time to 3.2seconds - this will allow for one run through the animation.
From the Action menu choose Preview; this should show, in the main graphics window, what will appear in the movie but will not actually record anything. It should run once through the animation. If you double the run time and Preview again you should see the animation run forwards and then backwards to finish on the initial frame. To actually make the movie you should select Make movie in stages and Record frames from the Action menu - this will save the screenshots that will make the frames of the movie. When this is finished select Make movie scene from the menu; this runs an external process to convert the individual frames into one movie file, when the process is finished the movie should be played automatically. The movie file will be called something like
...ccp4mg_tutorial/test.ccp4mg_presentation/scene_00001/movie.gif