Contents
Imported imagesLegends
Annotation
Adding annotation
 |
CCP4 Molecular Graphics Documentation | |
| Text and imported images |
| Documentation Contents | On-line Documentation | Tutorials | CCP4mg Home |
CCP4mg can load and display images in PNG,GIF, PPM, TIFF, JPG and other formats. This option might be useful for displaying a logo or a graph. The loaded images and legends are grouped under Legends&Images on the Display Table.
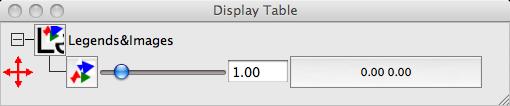
The row in the Display Table for each Image object has a slider controling the scale and a button to an interface for the x position and y position of the object. The image icon menu (click on  ) has option:
Move object a red cross on the left side of the display table indicates the moving object. The image can be dragged around the screen by moving the cursor while holding down the x key and the middle mouse button (assuming standard mouse bindings).
A legend is text that can be placed anywhere on the 2D screen. It can be created by selecting either Create object and Legend from the File pull-down menu or Add legend from the Legends&Images icon menu. The two columns in the Display Table row for Legend object are a button that is initially labelled Legend and an interface to control x and y position. The Legend button brings up a text editor window in which the font and colour or the text can be set,the text can be underlined or made bold or italic.
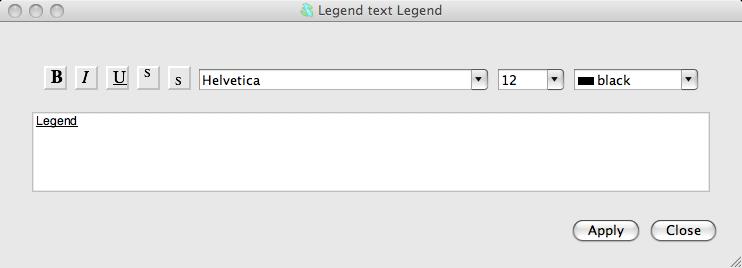 Sadly no spell-checker.
The Legend icon menu (click on  ) has joptions:
Move objecta red cross on the left side of the display table indicates the moving object. The image can be dragged around the screen by moving the cursor while holding down the x key and the middle mouse button (assuming standard mouse bindings).
Notes on Fonts
The fonts available within CCP4mg depend on what is available on your computer.
In CCP4mg2 text is not rescaled if you change the size of the display but it IS rescaled if you output images at a different scale.
Greek symbols such as alpha or beta can usually done with a Symbol font.
Annotation is text that is attached to a model object and which moves in 3D with the model object. Annotation can be created by selecting Annotation from the Add display object item on the model icon menu. The easiest way to add annotation is via Add annotation on the atom context menu (click on an atom with the right mouse button) as described below.
The two items in the row for an Annotation object are:
Annotation button which opens a Text editor window as described above for Legends. Also see Notes on Fonts above.
Position Interface to the x,y,x position (initially the centre of the model).
The Annotation icon menu (click on  ) has options:
Move object the icon will be highlighted in gold and the image can be dragged around the screen by holding down the x key and the middle mouse button (assuming standard mouse bindings).
The easiest way to add annotation is via Add annotation on the atom context menu (click on an atom with the right mouse button).
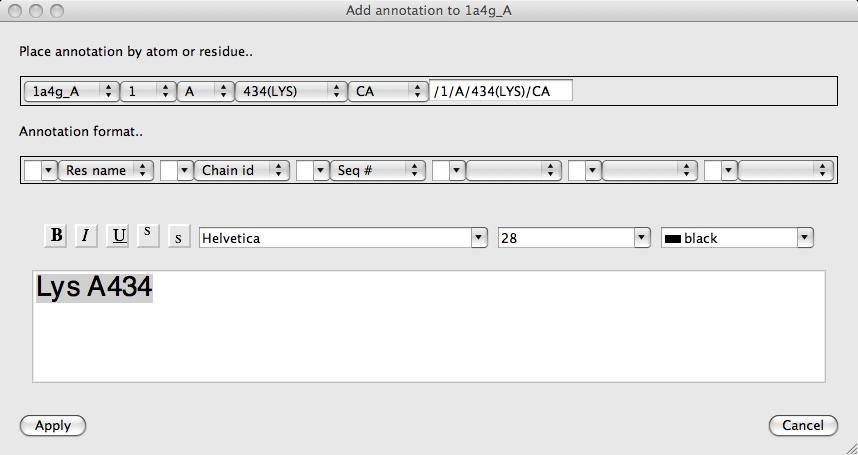
In the new window you can use the Annotation format line to select the syntax of a structure identification label using the identifiers (model, chain, resID, restype, atomID or altLoc) and separators. The identifier of the picked atom, in the selected syntax, is shown in a text input box below the menus. You can manually edit the text in the box if you like. After clicking the Apply button a new Annotation object appears in the display window and the annotation is displayed on the model. The new annotation object is the active moving object, indicated by a red cross by the Annotation icon in the display table. To move the annotation hold down the x key and the middle mouse button. The best placing of the text obviously depends on the intended view. Note also that the size of the text does not change as the display window size changes.