| CCP4mg: The Picture Wizard | CCP4 Newsletter 46 Summer 2007 |
Liz Potterton and Stuart McNicholas
YSBL, University of York, York YO10 5YW
Email: ccp4mg@ysbl.york.ac.uk
Version 1.0 of CCP4mg was released at the end of 2006 and by the time you read this CCP4mg 1.1 should be available. This article presents some key developments in the new version.
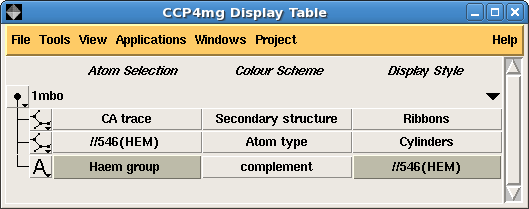
The main interface tool in CCP4mg is the Display table window which lists all of the data loaded into the program and for each data object lists the display objects which represent the data.
|
|
|
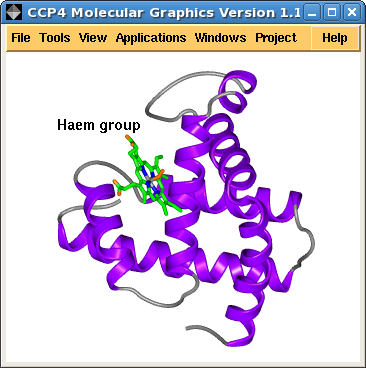
| Figure 1. A simple picture of myoglobin (1mbo) and the corresponding display table | |
Figure 1. shows a screen image and the corresponding display table interface. The loaded PDB file, 1mbo is shown in the display table and listed for it are three display objects:
Clicking on the various items in the display table opens menus and windows to enable changing the selected parameters. This interface is simple and powerful but initial setting up of a scene like this can take a little time. To save the user time in setting up some standard scenes we have developed the Picture Wizard.
The interface to the Picture Wizard shows thumbnail pictures of scenes grouped into Style Folders such as: nucleic acid, ribbons or ligand binding site. The interface to the nucleic acid style folder is shown in Figure 2. The user chooses one of the pictures (clicking a Create picture button) and their loaded model will be redrawn in the same style. There are options to retain any existing display objects (the default is not to) or to select limited fragments of the model to be redrawn in the new style so it is possible to build up a scene from several of the Picture Wizard templates.
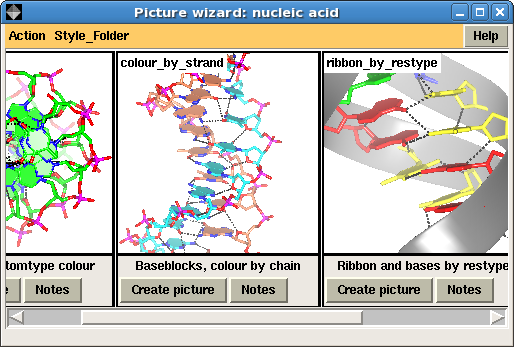 |
| Figure 2. The Picture Wizard interface showing nucleic acid templates |
The Picture Wizard also has tools to quickly add annotation to a scene. A right-mouse button click on an atom opens a pop-up menu with an option to Add Annotation. By default the annotation text is the residue or atom name of the picked atom in the user's preferred format; alternatively the user can enter some arbitrary text. The text is placed by the picked atom and its position can be adjusted interactively. This eliminates the need to add annotation to images in a separate drawing program.
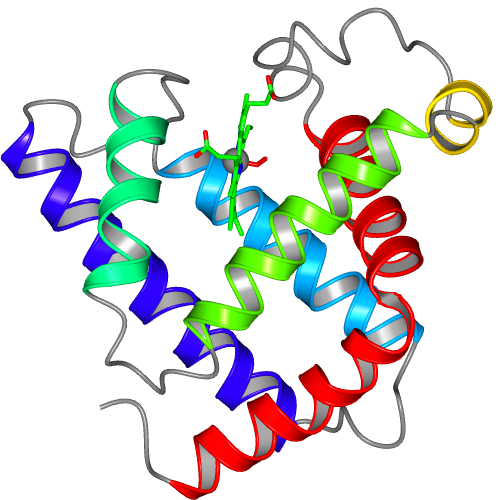
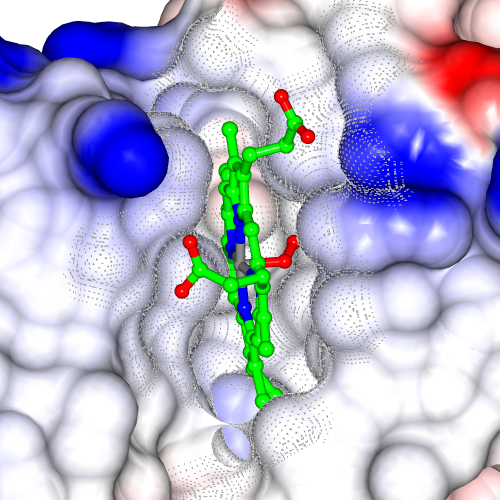
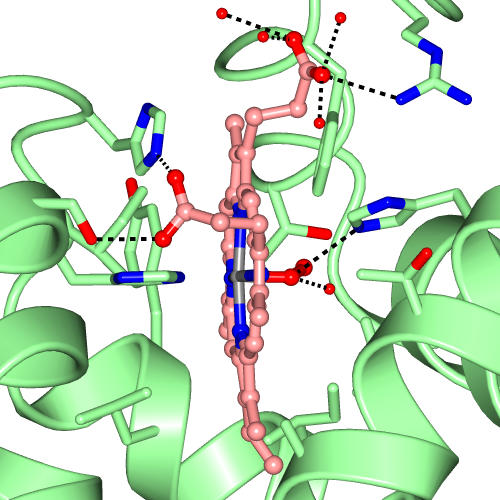
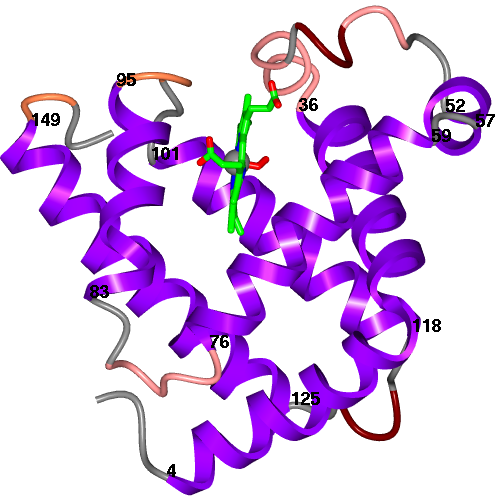
The Picture Wizard functionality is also accessible from the coordinate file selection window. The file selection window has a menu listing the Picture Wizard templates and if a template is selected it will be applied to the coordinate file as it is loaded. For example a series of scenes created with myoglobin, 1mbo, are shown in Figure 3. and Figure 5.
 |
 |
 |
| Figure 3. Myoglobin, 1mbo, scenes created with various Picture Wizard templates: ribbons coloured by blend thru model, ligand binding site surface and ligand binding site. | ||
The Picture Wizard template library has two files associated with each template: an image file for display in the interface and a template file which is used by the Picture Wizard application to create the appropriate display objects for the model. A user can create their own Picture Wizard templates either by modifying one of the distributed templates or from a scene that they have set up. The Picture Wizard interface has options to save both an image of the current scene and to create a template file based on the current display.
The templates distributed with CCP4mg are intended to be flexible and to handle a variety of model structures and so tend to be quite complex. Users creating their own templates may be happy with a simple template that can be applied to series of similar structures. You only need to be concerned with the template file format if you wish to customise it.
Template files contain several sections including a short title and documentation. The two important sections are the CHOICES section which defines a user interface such as shown in Figure 4. and the SCRIPT section which defines the display objects to be created. The user interface defined in the CHOICES section is presented to the user when they select a picture from the Picture Wizard interface and typically it requires the user to select which of the loaded models is to be redrawn and, optionally, to select particular chains, residue ranges or ligands. Additional options such as whether to label residues may also appear.
The SCRIPT section uses the Picture Definition File format (described below) to define the display objects that are to be created and drawn. The script has access to the parameters input to the CHOICES interface by the user and the script can query the loaded structure - for example to find out if the structure contains nucleic acid or solvent.
Earlier versions of CCP4mg used a Python scripting language facility called Pickle to save the program status. The saved 'pickle' files have the extension pkl but are not human readable. The new Picture Definition File also completely saves the program status but is a more accessible format that can be written by other programs or edited by users that choose to edit scripts. The files are usually given the extension mgpic.py. The aspects of CCP4mg that are saved in a picture definition file are:
The Picture Definition Language is based on the Python scripting language and uses the Python syntax for creating a series of objects1 with specified attributes. Some examples of the object types:
MolData - model data object
MolDisp - model display object
Annotation - annotation display object attached to a MolData object
ParamsManager parameter manager - a group of preferences corresponding to one Preferences window
The object types and their attributes are documented (as part of built-in documentation and on the CCP4mg website) but probably the easiest way to 'read' and edit a picture definition file is to load it into CCP4mg and use the interface!
     MolDisp ( selection = 'catrace',
               colour = 'secstr',
               style = 'SPLINE'    )

     MolDisp ( selection_parameters =  {
                         'select' : 'nopeptide',
                         'monomers' : ['//546(HEM)' ]  },
               colour = 'atomtype',
               style = 'BALLSTICK'  )

     Annotation ( text = 'Haem group',
                  colour = 'complement',
                  position = [-4.98, 9.94, -9.50, '//546(HEM)'],
                  font =  {   'family' : 'helvetica',
                              'slant' : 'r',
                              'weight' : 'bold',
                              'size' : 14  } )
|
| Figure 4. Example of Picture Definition File - the display objects that are shown in Figure 1. |
The example in Figure 4 shows the definition of the three display objects that appear in Figure 1. For the two MolDisp objects (model display objects) the selection, colour and style attributes are specified. For the second MolDisp object specifying the selection requires two parameters and these are grouped as a dictionary (a Python language construct enclosed in curly brace {}) called selection_parameters. The third, Annotation object has attributes text, colour, position and font.
A Picture Wizard template file contains the definition of display objects similar to those shown in Figure 4 but this example highlights an important issue for template files. The name of the highlighted group, '//546(HEM' is given explicitly in this picture definition but in different structures the group to be highlighted will probably have a different name. To handle this the template can either ask the user to select a group (using the CHOICES interface) and/or can query the loaded structure to find the 'monomer' groups (i.e. not amino acid, nucleic acid, solvent or solute) and highlight them all.
The CCP4mg developers will be happy to hear any suggestions for further useful picture wizard templates or to advise if you are creating your own templates.
 |
 |
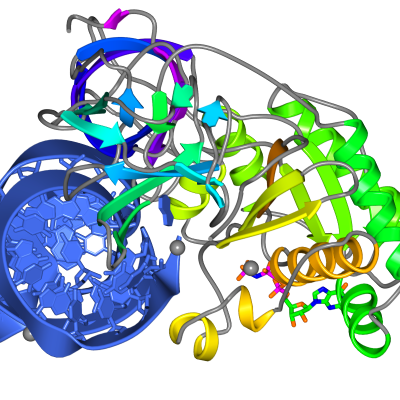 |
| Figure 5. Myoglobin, 1mbo, scenes created with secondary structure and protein core Picture Wizard templates and the protein-RNA complex of 1b23 picture created with the ribbon colour blend template. | ||
1 We have used terms 'object' and 'type of object' rather than the programmer's terms 'instance of class' and 'class' in the hope that they are less intimidating to non-programmers.
Liz Potterton & Stuart McNicholas, July 15th 2007