Contents
IntroductionCreating a Presentation
 |
CCP4 Molecular Graphics Documentation | |
| Presentations |
| Documentation Contents | On-line Documentation | Tutorials | CCP4mg Home |
This is graphical interface to saving and restoring multiple
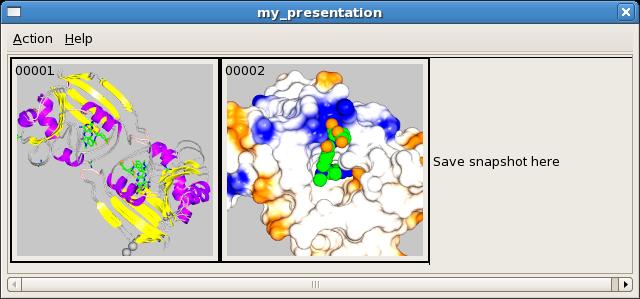
program status files. The Presentation application enables one user to set up multiple scenes within CCP4mg and save them so that other users (perhaps colleagues or students) can restore and examine exactly the same scene. The application could also be helpful preparing in advance for a presentation using CCP4mg 'live'. To save a scene the application makes a snapshot image of the scene and saves a CCP4mg status file. The snapshots are displayed in a window similar to the Movie interface window:
Double clicking on one of the snapshots in the interface caused the appropriate status file to be read and the program status shown in the snapshot is restored.
The snapshot and status files are saved in a directory which is given a name with the file extension .ccp4mg_presentation. To package up the presentation to send to someone else the application has a tool to copy all the data files used in the presentation to the .ccp4mg_presentation directory and to compress (zip) the directory.
To begin pick Edit/show Presentation from the File pull-down menu. If you are creating a new presentation enter a name for it. For a presentation called foo CCP4mg creates a directory foo.ccp4mg_presentation in your current project directory. This directory will contain all of the snapshot and status files that are created.
To load a snapshot, set up the display as you want it and then click on the Save snapshot here frame and select Save current view/display from the popup menu. The current program status is saved to a status file and a small snapshot image is made and displayed in the presentation interface as shown in the Introduction.
Note that the first snapshot is labelled 00001 and subsequent snapshots will be labelled 00002, 00003 etc.. There is a text entry box under the snapshot in which you can enter a title for that snapshot.
A left mouse double-click on a snapshot picture will restore the status of that
snapshot. A right mouse click on a snapshot picture will bring up a popup menu with options to
Restore the display and/or the view saved for that snapshot
Replace the snapshot with the current display status
Cut to remove the snapshot from the interface (but note that files are not deleted and can be restored using the Load existing snapshot option in the Insert frame).
Copy to save the snapshot to a buffer which can be Pasted in the Insert frame.
Next and Previous will load the status corresponding to the next or the previous snapshot.
Exit Exit the Presentation interface.
Cleanup old files will delete any snapshot and status files that have been removed from the interface.
Package presentation will collect all data files referenced in the presentations status files to the presentation directory and change the status files so that they now expect the data files to be in the presentation directory. Optionally compress the directory using a zip mechanism.